

Quick insertion technique of the eight-strand cable lute head
Release time:
2020-02-28
Eight-strand cable is one of the main types of ship mooring cables. Due to the frequent use of cables during berthing and mooring operations, wear and tear are inevitable. In particular, the lute head used for piles in mooring operations, if broken due to incorrect plugging methods or failure to plug in in time after wear, will seriously threaten the safety of ships and docks, and sometimes cause casualties and huge property losses. Mastering the quick plugging method of the lute head can ensure the safety of the ship and avoid blindly and frequently changing cables, which can reduce the operating costs of the ship.
Quick plugging skills of the eight-strand cable lute head
Eight-strand cable is one of the main types of ship mooring cables. Due to the frequent use of cables during berthing and mooring operations, wear and tear are inevitable. In particular, the lute head used for piles in mooring operations, if broken due to incorrect plugging methods or failure to plug in in time after wear, will seriously threaten the safety of ships and docks, and sometimes cause casualties and huge property losses. Mastering the quick plugging method of the lute head can ensure the safety of the ship and avoid blindly and frequently changing cables, which can reduce the operating costs of the ship.
1 The structure of the eight-strand cable
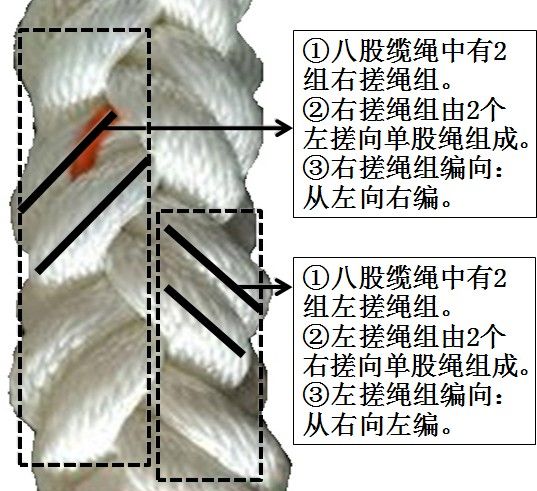
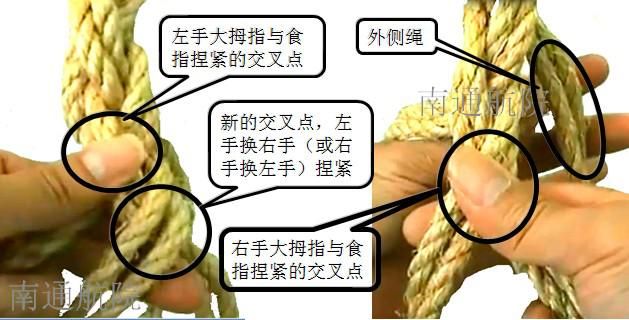
The eight-strand cable is made of 8 strands of rope divided into 4 groups, each group has 2 strands. The 2 groups braided from left to right are right-twisted rope groups, and the 2 single strands in the right-twisted rope group are left-twisted ropes; the 2 groups braided from right to left are left-twisted rope groups, and the 2 single strands in the left-twisted rope group are right-twisted ropes; the braiding direction is the direction of the strands in the whole cable. It is necessary to recognize the twisting direction and braiding direction to avoid wrong insertion during splicing. 2 Imitation braided eight-strand cable The finished eight-strand cable is produced by mechanical means. During use, if the strands are broken and loose, or too loose when splicing the cable, if you don’t know how to braid the eight-strand cable, it will cause waste of the cable and reduce the strength of the cable. The formula for imitation braided eight-strand cable: pinch the intersection, find the outer rope, and braid from left (right) to right (left).
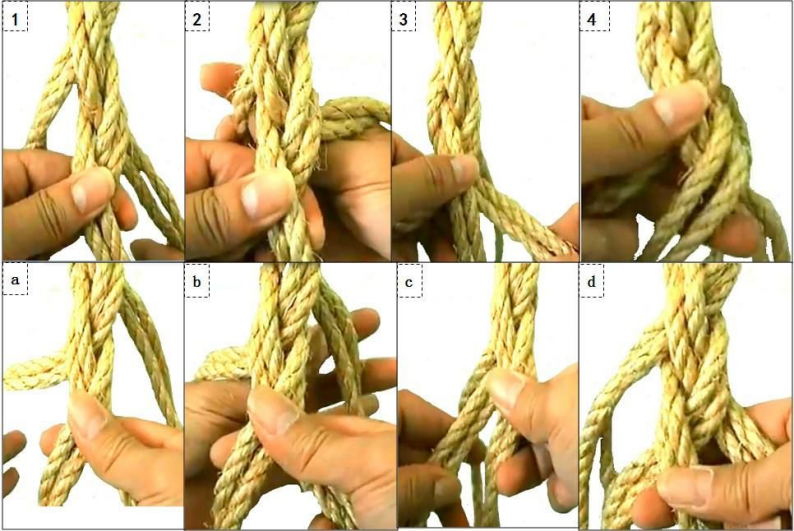
Imitation braiding method: The imitation braiding steps of the eight-strand cable are as shown in the following figures (1, 2, 3, 4) and (a, b, c, d).
1) Place the four rope groups on both sides, two groups on each side; then cross and stack the two middle groups together.
2) Use the thumbs and index fingers of the left and right hands to pinch the intersection of the two groups. Taking the figure (1, 2, 3, 4) as an example, pinch the intersection with the left hand, Figure (1); stretch the right hand from the right side into Figure (2); pull the leftmost group from the left to the right side, Figure (3).
3) During the pulling process, pay attention to tightening and flipping the rope group so that it smoothly transitions to the bottom of the intersection, Figure (3, 4).
4) Place the rope group flat and close to the bottom of the intersection to form a new intersection Figure (4). 5) Then change hands to pinch the new intersection, and continue to braid according to Figure 4-1-4 (a, b, c, d), and continue to braid the rope until the end.
3 Eight-strand cable lute head plug
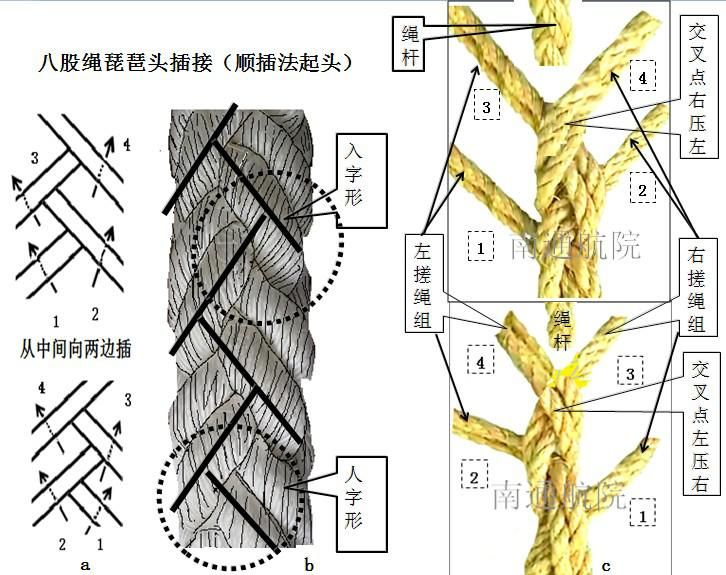
1) Before splicing, tie with a small rope at a distance of about 5 times the circumference of the rope head (you can use four-flower loose 5 to 6 flowers) (untie when tightening after starting, and skilled people can skip tying), then loosen the rope heads of each group and put them together, cut them into cones with scissors for easy splicing, and then use tape or cotton yarn to wrap and tie the cone-shaped rope heads of each group together. Usually, three-flower groups are inserted after the start. 2) After preparation, when starting to splice, follow the natural braiding direction of the rope group, find the intersection, coil the rope head of the rope group toward the root of the rope, and naturally stick it to the rope rod, put the 2 groups of left twist on the left side of the rope rod, and the 2 groups of right twist on the right side of the rope rod. According to the size of the pipa head, place the intersection close to the rope group to be spliced on the rope rod. 3) According to the cross-pressure position of the two groups of rope ends at the intersection (the left twisted rope group presses the right twisted rope group, and the right twisted rope group presses the left twisted rope group), the order of rope head insertion is determined. The number is determined according to the position of the rope head close to the pipa head. The group closest to the pipa head is set as 1, followed by 2, 3, and 4. The 1st and 3rd groups are rope groups with the same twist direction, and the 2nd and 4th groups are also rope groups with the same twist direction. The first group is started from the first group. 4) According to the cross-pressure position of the 3rd and 4th groups of rope heads at the intersection, the insertion hole on the rope rod to be inserted is determined, that is, the rope group to be inserted in the shape of "人" or "入" on the rope rod. Usually, at the intersection of the spliced rope groups, the left twisted rope group presses the right twisted rope group to insert in the shape of "人", and the right twisted rope group presses the left twisted rope group to insert in the shape of "入", that is, "left pressure right insertion, right pressure left insertion". 5) Insert the rope ends of the splicing rope group from the middle of "人" or "入" to both sides (group splicing group). Ensure that the twisting direction of the 4 splicing rope groups is consistent with the twisting direction of the rope group inside the splicing hole (the spliced rope group), and complete the starting in the order of 1, 2, 3, 4, and arrange and tighten. 6) Turn the pipa head 180°, and insert the splicing rope groups 1, 2, 3, and 4 in sequence along the direction of the rope group inside the splicing hole (the spliced rope group), and complete the first flower splicing. 7) Continue to insert two flowers according to the above method, and complete the group splicing group with the starting point inside and a total of four flowers. Finally, put the rope ends together, tie them tightly, cut off the excess rope ends, or iron them flat with a soldering iron. In addition, you can also use the following method to perform quick splicing. ① Use the splicing number to determine whether to insert the "人" shape or "入" shape on the spliced rope group. If the first group is a right-twisted group, insert the "人" shape, if the first group is a left-twisted group, insert the "入" shape. ② When the grouping is determined, directly start from the first group closest to the pipa head and insert from the middle to both sides. ③ Then follow the method described above to complete the splicing.
Recent information


DO YOU HAVE QUESTIONS?
Get In Touch With Us!
CONTACT US
Factory add :
55 #, Youdian Road, Qingfeng Industrial Park, Jianhu, Yancheng City, Jiangsu Province,China.
Office add :
No.198 JingGangShan Road, JinDing Tower,
16F 6-9, HuangDao, QingDao, ShanDong, China.


